

![]() This won’t be the first article on the Internet to discuss Internet sharing with a Mac. Yet after hours of searching and reading not one addressed my situation related to connecting a Mac Pro without Wi-Fi to an iMac running Yosemite with Wi-Fi. What follows is the solution I was able to piece together.
This won’t be the first article on the Internet to discuss Internet sharing with a Mac. Yet after hours of searching and reading not one addressed my situation related to connecting a Mac Pro without Wi-Fi to an iMac running Yosemite with Wi-Fi. What follows is the solution I was able to piece together.
Since moving I’ve been without a wired network until I embrace the idea of tearing out some drywall to facilitate the final running of cable. The down side of this besides Wi-Fi being slow as a snail, is not all of my machines have Wi-Fi capability. My main music machine, an old Mac Pro, is among them which has really limited what I can do with this old boy. So I needed to be able to connect this guy to my iMac via network cabling to not only share files but to access the Internet. I’m thrilled to say that problem is now resolved.
Internet Sharing & Networking
Internet Sharing on a Mac is not a new concept of feature, but it is one I’ve never had to utilize before now. It’s a pretty cool thing and in all of my searching and reading I’ve learned some ‘new’ things I might not have otherwise come across.
The major ah-ha moment came from MacTip where I read “Connect an Ethernet cable into the wi-fi connected mac, and the other end into the PC, simple as that. No crossover cable or other networking hardware needed”. Whoa! No kidding?! When did this change? Being the die hard wired network believer I’ve got a handful of switches lying around and have never questioned the need for them to connect computers together via network cables. So I immediately removed the switch from the set-up and discovered this really works. Awesome! I probably didn’t need to remove the switch but any way something like this can be simplified the better.
The Settings
This is where the ‘magic’ happens. It’s also what was the most difficult to get concise answers on. Oh it’s not at all difficult to do and all settings can be done right in the System Preferences GUI without ever opening Terminal. However it’s not uncommon to find instructions for editing your settings for an older version of OS X but they don’t directly relate to the current version you’re running. Again, the reason for this post.
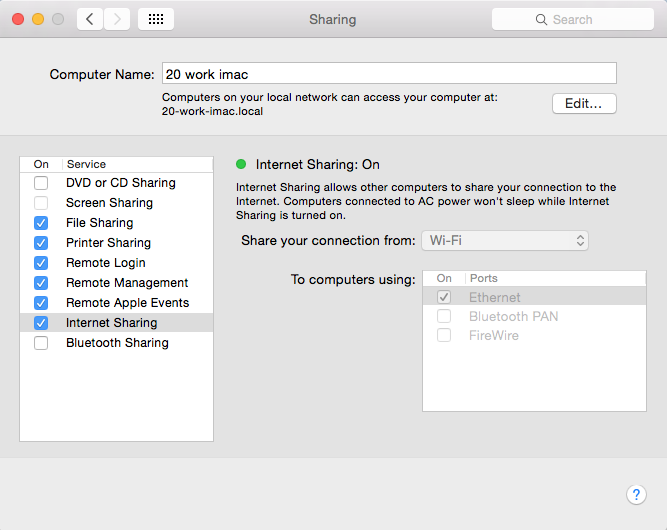
You can find many articles online for Internet Sharing and they all involve opening up System Preferences, navigating to Sharing, clicking on the Internet Sharing tab, selecting which connection method you wish to share your Internet connection with, and then checking the box that enables Internet Sharing, and then clicking on the Start button in the window that pops up.. It’s important to note that you must select the connection method you wish to share your Internet connection with first before starting the service. In my case, I need to share my Wi-Fi Internet connection on my iMac with the Mac Pro that is connected to the iMac via ethernet, so “Share your connection from” gets set to Wi-Fi and “To computers using” needs “Ethernet” checked as shown below.
Simple. But simply making that change didn’t give me Internet Sharing for the Mac Pro. Time to dig deeper.
The Investigation
Several resources mentioned firewall settings which I reviewed, and eventually disabled it in case it was interfering in any way. I also run TCPBlock which is unfortunately no longer actively developed. I located a couple of process that were being blocked and allowed them access but still had no sharing, so I disabled this too in case there was something here interfering as well. Nothing.
One of the most important clues as to why it wasn’t simply working as so many sites insisted it should, I found over at Aleph 0 Computing. I didn’t realize the importance of this clue until I’d read it 3 or 4 times. Here I found “…no matter what, Internet Sharing always uses “internal” numbers on the 192.168.2.0 subnet, a real no-no if there’s already another 192.168.2.0 subnet”.
Hmmmm.
Whether allowing DHCP to auto assign addresses on my network, or in some cases where I want a machine to have a constant IP and I set it manually, I’ve always seen or used a 192.168.1.0 subnet. However, I got to thinking about this after reading that article at Aleph 0 Computing.
Initially when connecting the iMac and Mac Pro together without a switch or router in between, both machines were given a “self assigned” IP by DHCP which is in the 169.254.198.0 subnet. So that should work since it’s not using the 192.168.1.0 subnet, but it doesn’t. Yet setting the IP manually and trying the usual 192.168.1.0 subnet didn’t either. In re-reading the article on Aleph 0 Computing I spotted “…you always know the Mac will be at 192.168.2.1, so you may as well just use that number”.
Ohhhh-kaaaay, right. When you enable Internet Sharing on the Mac apparently (and I didn’t attempt to verify this elsewhere) the connection to the computer that needs Internet access, in this case the Mac Pro, will use the 192.168.2.0 subnet. However DHCP doesn’t assign this subnet to that connection so I don’t know how you would ever discover this on your own. My manually setting the IP addresses to the 192.168.1.0 subnet would not only be ignored by the Internet Sharing connection, but would also risk possible collisions in the iMac with 2 different IPs given to the same machine.
The Solution
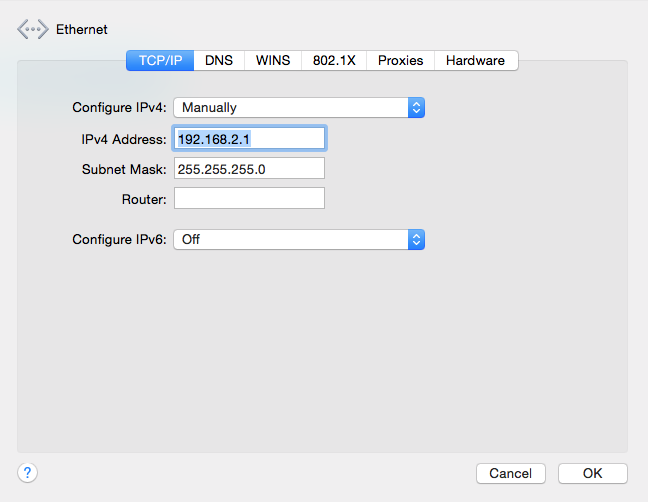
Using my new found knowledge regarding the subnet Internet Sharing will always use, I manually set my iMac Ethernet IP to act as a router, giving it the address of 192.168.2.1 and leaving the router IP blank as so:
Then I manually set the Mac Pro Ethernet IP to 192.168.2.2 with the router IP set to 192.168.2.1:

EUREKA! That was it. My Mac Pro has Internet again.
Hopefully this post will one day help someone else quickly resolve this issue.
Leave a comment, or trackback from your own site.